Monday, 5 March 2018

Extent Report with Selenium Wrapper Automation

Extent report is very interesting feature in selenium web driver. When we want to create any extent report then we need to create object of 'ExtentReports' and 'ExtentTest' class. We also need to set all the basic information related to test case like test case name, author name, Configuration file etc.

This all actions are basic and common actions for all extent report. So, we can out all this action in one separate class and create separate methods for all the action. It will be very helpful when we required more that one test report in single test case.

Just we need use object of that class and use different methods as per needed. If we declare all the method static then we don't need to create object of that class. we can access all the methods with class name.

If you don't know how to configure Extent Report then go to below URL.
Configuration

I have created one class 'ExtentReportUtility' for selenium wrapper automation.

Inside this class, I have created different methods for create report, set test case, write log for test step etc.

import java.io.File;
import org.openqa.selenium.WebDriver;
import org.openqa.selenium.WebElement;
import com.relevantcodes.extentreports.ExtentReports;
import com.relevantcodes.extentreports.ExtentTest;
import com.relevantcodes.extentreports.LogStatus;
import com.relevantcodes.extentreports.NetworkMode;


public class ExtentReportUtility 
{
 
 public ExtentReports extentReport;
 public ExtentTest extentTest;
 
 public ExtentReports mSetupExtentReport(String vReportName)
 {
  String vReportPath  = "\\ path of where you want to store report";
  String vConfigPath = "\\ path of extent config file";   
  
  extentReport = new ExtentReports(vReportPath + vReportName + ".html", true, NetworkMode.OFFLINE);
  extentReport.loadConfig(new File(vConfigPath));
  
  return extentReport;
 }
 
 public ExtentTest mSetupTestCase(ExtentReports Report, String vTestcaseName, String vDescription, String vAuthor)
 {
  extentTest = Report.startTest(vTestcaseName, vDescription);
  extentTest.assignAuthor(vAuthor);
    
  return extentTest;
 }
 
 public ExtentTest mWriteLog(ExtentTest Test, String vStatus, String vDescription)
 {
  switch(vStatus.toLowerCase())
  {  
  case "pass":
   
   Test.log(LogStatus.PASS, vDescription);   
   break;
   
  case "fail":
   
   Test.log(LogStatus.FAIL, vDescription);   
   break;
   
  case "error":
   
   Test.log(LogStatus.ERROR, vDescription);   
   break;
   
  case "fatal":
   
   Test.log(LogStatus.FATAL, vDescription);   
   break;
   
  case "info":
   
   Test.log(LogStatus.INFO, vDescription);   
   break;
   
  case "warning":
   
   Test.log(LogStatus.WARNING, vDescription);   
   break;
   
  case "skip":
   
   Test.log(LogStatus.SKIP, vDescription);   
   break;
   
  case "unknown":
   
   Test.log(LogStatus.UNKNOWN, vDescription);   
   break;
  
  }
  
  return Test; 
 }
 
 public ExtentTest mAppendChild(ExtentTest ParentTest, ExtentTest ChildTest)
 {  
  ParentTest.appendChild(ChildTest);
  
  return ParentTest;
 }

}

If you want to see that how to use all methods of these class then I have also created one small class for demo purpose.

Please see below is code. You can see I have used object of 'ExtentReportUtility' class to create report, set up test case and other stuff.


public class ExtentReport 
{
 WebDriver driver = null;
 
 public ExtentReports extentReport;
 public ExtentTest extentTest;
 
 @Test
 public  void mExtentReportDemo() throws Exception
 {
  ExtentReportUtility objExtentReportUtility = new ExtentReportUtility();
  
  extentReport = objExtentReportUtility.mSetupExtentReport("Test Automation Report");
  
  extentTest = objExtentReportUtility.mSetupTestCase(extentReport, "First Test Case", "First Test Case", "Sameer");
    
  GetDriver objGetDriver = new GetDriver();  
  driver = objGetDriver.mGetDriver("chrome", false);
    
  objExtentReportUtility.mWriteLog(extentTest, "pass", "Browser launched successfully.");
  
  
  // Go to Google in Browser
  driver.get("https://www.google.co.in");
  Thread.sleep(2000);
          
  objExtentReportUtility.mWriteLog(extentTest, "pass", "Google is open successfully.");
  
  // Search for Selenium in Google
  driver.findElement(By.id("lst-ib")).sendKeys("test");
  
  // Click on Search button
  driver.findElement(By.xpath("//input[@value = 'Google Search']")).click();
  Thread.sleep(3000);  // you can use implicit or explicit wait here. It is good practice.
  
  // Verify First link should be 'Selenium - Web Browser Automation'  
  WebElement link = driver.findElement(By.xpath("//a[text() = 'Selenium - Web Browser Automation']"));  
  try
  {
   if(link.isDisplayed())
   {    
    objExtentReportUtility.mWriteLog(extentTest, "pass", "First link is correct.");
   }  
  }
  catch (Exception E)
  {   
   objExtentReportUtility.mWriteLog(extentTest, "fail", "First link is not correct.");
  }
    
 }
 
 @After
    public void setupAfterSuite() 
 {
  driver.close();
  driver.quit();
  extentTest.log(LogStatus.PASS, "Browser closed successfully.");  
  extentReport.endTest(extentTest);
  extentReport.flush();
  extentReport.close();  
    }

}


Please add comment if you have any question.

Test Result with Extent Report in Selenium Webdriver

Test result report is very important part in selenium automation. Based on test result report we can verify that script is successfully run or we can verify status of verification point.

Below are selenium webdriver reporting tools.
  • TestNG Report
  • JUnit Report
  • Extent Report
In this article, we will see how to generate extent report in selenium webdriver.

Extent report is third party tool which is used for generate user friendly HTML report in selenium web driver. There is two edition for extent report. Community edition is free ware and Pro is not free ware.  

Configuration:

Extent report is depend on testng library. So first of all you have to add testng jar files into your project.

If you are using maven structure then add below dependency into 'pom.xml' file.

<dependency>
    <groupId>com.aventstack</groupId>
    <artifactId>extentreports</artifactId>
    <version>3.1.3</version>
</dependency>

You can use latest version from URL Extent Report Maven Dependency.

If you are not using maven structure the you have to add .jar file into build path of your project.

You can download extent report jar file from below URL.
Extent Report

Now you can use Extent Report features into your project for report generations.

There is main two classes for report generation. 'ExtentReports' and 'ExtentTest'.

ExtentReports class is used for create new report and load configuration file. Configuration file is used for set basic configuration of report like theme, headline, data format, time format etc.

ExtentTest class is used for set author name, test type, test step description etc.

Please see below is sample code for how to generate extent report.


import java.io.File;

import org.junit.After;
import org.junit.Test;
import org.openqa.selenium.By;
import org.openqa.selenium.WebDriver;
import org.openqa.selenium.WebElement;
import org.testng.annotations.BeforeSuite;

import com.relevantcodes.extentreports.ExtentReports;
import com.relevantcodes.extentreports.ExtentTest;
import com.relevantcodes.extentreports.LogStatus;
import com.relevantcodes.extentreports.NetworkMode;

import CommonUtilities.GetDriver;


public class ExtentReport 
{
 WebDriver driver = null;
 
 public ExtentReports extentReport;
 public ExtentTest extentTest;
 
 @Test
 public  void mExtentReportDemo() throws Exception
 {
  String vReportPath  = "D:\\Study\\Selenium\\Testing\\GitRepository\\SeleniumAutomation\\lib\\TestResult\\TestResult.html";
  String vConfigPath = "D:\\Study\\Selenium\\Testing\\GitRepository\\SeleniumAutomation\\Configs\\extent-config.xml";
  
  extentReport = new ExtentReports(vReportPath, true, NetworkMode.OFFLINE);
  extentReport.loadConfig(new File(vConfigPath));   
  
  extentTest = extentReport.startTest("First Test", "This is First Test");
  extentTest.assignAuthor("Sameer");
  
  GetDriver objGetDriver = new GetDriver();  
  driver = objGetDriver.mGetDriver("chrome", false);
  
  extentTest.log(LogStatus.PASS, "Browser launched successfully.");
  
  // Go to Google in Browser
  driver.get("https://www.google.co.in");
  Thread.sleep(2000);
        
  extentTest.log(LogStatus.PASS, "Google is open successfully.");
  
  // Search for Selenium in Google
  driver.findElement(By.id("lst-ib")).sendKeys("Selenium");
  
  // Click on Search button
  driver.findElement(By.xpath("//input[@value = 'Google Search']")).click();
  Thread.sleep(3000);  // you can use implicit or explicit wait here. It is good practice.
  
  // Verify First link should be 'Selenium - Web Browser Automation'  
  WebElement link = driver.findElement(By.xpath("//a[text() = 'Selenium - Web Browser Automation']"));  
  try
  {
   if(link.isDisplayed())
   {
    extentTest.log(LogStatus.PASS, "First link is correct.");
   }  
  }
  catch (Exception E)
  {
   extentTest.log(LogStatus.FAIL, "First link is not correct.");
  }
    
 }
 
 @After
    public void setupAfterSuite() 
 {
  driver.close();
  driver.quit();
  extentTest.log(LogStatus.PASS, "Browser closed successfully.");
  extentReport.endTest(extentTest);
  extentReport.flush();
  extentReport.close();  
    }

}


Code Explanation : 


public ExtentReports extentReport;
public ExtentTest extentTest;

It is for create object of ExtentReports and ExtentTest class.

extentReport = new ExtentReports(vReportPath, true, NetworkMode.OFFLINE);

vReportPath : It is for set report path at which place you want to generate report.

true : It will replace report if same report is already existing

NetworkMode.OFFLINE : all report artifacts will be stored locally in %reportFolder%/extentreports with the following structure:
- extentreports/css 
- extentreports/js

extentReport.loadConfig(new File(vConfigPath));

It is for loading configuration file. You can download configuration file from below URL.
Extent Report Configuration File


extentTest = extentReport.startTest("First Test", "This is First Test");

It is for create test case.

extentTest.assignAuthor("Sameer");

Set author of test case.

extentTest.log(LogStatus.PASS, "Browser launched successfully.");

It is for add test step into test case with description.

extentReport.endTest(extentTest);

It is for end test and add all log into Report.

extentReport.flush();
extentReport.close();

It is used for close report.

Please see below screen shot for Extent report.


You can see UI of report is very attractive and user friendly. We do not need to record time stamp of any test step. Extent report automatically handle internally and display in the report.

Please add comment if you have any question.

Extent report with Selenium Wrapper Automation.
Extent Report with Selenium Wrapper Automation


Saturday, 3 March 2018

Mouse and Special Keyboard Action with Selenium

Sometime in testing, we need to do some operations with mouse and keyboard. 
Selenium web driver directly can not handle mouse and keyboard event like double click, right click, pressing key combination in keyboard.

We can handle such type of event with Actions class in selenium webdriver. We have to create object of that class and perform action which we want.

Double Click

Syntax : action.doubleClick(WebElement).build().perform();

  Actions action = new Actions(driver);
  
  // It is google search text box
  WebElement wSearch = driver.findElement(By.id("lst-ib"));
  
  // enter 'test' on search text box and double click on that. So test will select.
  wSearch.sendKeys("test");
  action.doubleClick(wSearch).build().perform();
  Thread.sleep(2000);

ContextClick (Right Click)

Syntax : action.contextClick(WebElement).build().perform();

  Actions action = new Actions(driver);
  
  // It is google search text box
  WebElement wSearch = driver.findElement(By.id("lst-ib"));
  
  // right click on google search test box
  action.contextClick(wSearch).build().perform();
  Thread.sleep(2000);

ClickAndHold


Syntax : action.clickAndHold(WebElement);

  Actions action = new Actions(driver);
  
  // It is google search text box
  WebElement wSearch = driver.findElement(By.id("lst-ib"));
  
  // Click and hold on search text box.
  wSearch.sendKeys("test");
  action.clickAndHold(wSearch).build().perform();
  Thread.sleep(2000);

KeyDown and KeyUP

Syntax : action.keyDown(Key_modifier) and action.keyUp(Key_modifier)

Key Modifier: Keys.SHIFT, Keys.CONTROL, Keys.ALT etc.

If we want to press keyboard key on particular web element then we also need to pass that element with function.

action.keyDown(WebElement, Key_modifier)
action.keyUP(WebElement, Key_modifier)


  Actions action = new Actions(driver);
  
  // It is google Search text box
  WebElement wSearch = driver.findElement(By.id("lst-ib"));
  
  // Enter 'Selenium' in capital letters in search text box
  action.keyDown(wSearch, Keys.SHIFT).sendKeys("selenium").keyUp(wSearch, Keys.SHIFT).build().perform();
  Thread.sleep(2000);

We can also do series of multiple action with Actions class. Please visit below blog for how to do series of multiple action with Actions class.


Series of Multiple actions with Selenium


How to do Series of Multiple Mouse and Keyboard actions in Selenium

Lets take an example for understand how to do series of multiple actions with Action class.

First Scenario: 

Suppose we need to send any word to text box with upper case with out using ToUpper() function.

First we have to press and hold 'SHIFT' key then enter word which we want to send to text box then release 'SHIFT' key. It is very easy to do with Action class.

  Actions seriesOfAction = new Actions(driver);
  
  // It is google search text box
  WebElement wSearch = driver.findElement(By.id("lst-ib"));
  
  seriesOfAction.keyDown(wSearch, Keys.SHIFT)   // Press and hold 'SHIFT' key
  .sendKeys("selenium") // Send 'selenium' word
  .keyUp(wSearch, Keys.SHIFT) // Release 'SHIFT' key
  .build() // Build all actions
  .perform();  // Perform all actions in sequence


Second Scenario:

Suppose we need to enter any word to text box then copy that word and again send word to that text box.

  Actions seriesOfAction = new Actions(driver);
  
  // It is google search text box
  WebElement wSearch = driver.findElement(By.id("lst-ib"));
  
  seriesOfAction.sendKeys(wSearch, "selenium")
  .doubleClick(wSearch)  // Double click on text. So that it will select whole text
  .sendKeys(Keys.chord(Keys.CONTROL, "c")) // Press Ctrl + C
  .sendKeys(wSearch, " ")  // For release double click and enter space after first word
  .sendKeys(Keys.chord(Keys.CONTROL, "v")) // Press Ctrl + v  
  .build() // Build all actions
  .perform();  // Perform all actions in sequence

Please add comment if you have any question.

Thursday, 1 March 2018

How to Handle Windows in Selenium

Many times we need to handle more than one windows in testing. It is due to many application has multiple windows. Handling more than one windows in selenium is very easy. We can handle each window with unique id of that window.

Selenium webdriver assign one unique alphanumeric id to each window as soon as web driver object is initiated. When we need to switch from base window to other window than we can switch to that wind using ID of that window.

GetWindowHandle

String vWindowHandle = driver.getWindowHandle();

Use : To get Window handle (Unique ID) of current window


GetWindowHandles

Set<String> vWindowHandles = driver.getWindowHandles();

Use : To get window handles of all windows.


We can use above to commands for switch to different window.

How to Switch to different windows?

Lets assume that current you have total three windows open and you want to switch to last window. 


String vBaseWindowHandle = driver.getWindowHandle();
Set<String> vWindowHandles = driver.getWindowHandles();
  
for(String temp : vWindowHandles)
{
 driver.switchTo().window(temp);
}
  
// Code for second window
  
driver.close();
driver.switchTo().window(vBaseWindowHandle);


Switch To Frame


Many application has multiple frame and when we do some operation on application then other frames will visible. For this scenario we need to switch that frame if we want to do some operations on that frame.

We can switch to frame with below command.


driver.switchTo().frame("name of frame");


Other type windows like pop up and alert also exists in many applications.

Please visit below post for how to handle pop up in selenium.

How to Handle PopUp in Selenium

Please add comment if you have any question.

How to Handle PopUp in Selenium

Many application has some pop up for display some success or failure message to user. We need to handle that types of pop up in script.

There are three types of pop Up.
  1. Web based pop up
  2. Alert message
  3. Window based pop up
How to handle web based Pop Up

Web based pop up can be handle using WindowHandle or SwitchToFrame command. First we need to identify type of pop up. 
If pop up is other window than we need to use WindowHandle command.
If pop up is just frame than we need to use SwitchToFrame command.

Using WindowHandle

  String vBaseWindowHande = driver.getWindowHandle();
  Set<String> vWindowHandles = driver.getWindowHandles();
  
  for(String temp : vWindowHandles)
  {
   driver.switchTo().window(temp);
  }
  
  // Code for Popup
  
  driver.close();
  driver.switchTo().window(vBaseWindowHande);

Using SwitchToFrame

  String vBaseWindowHande = driver.getWindowHandle();
  driver.switchTo().frame("Name of Frame");
  
  // Code for popup
  
  driver.switchTo().window(vBaseWindowHande);


How to handle Alert Message

Po pup type is alert then we have to use Alert class for handle alert.

you can use object of alert class for different operations on alert like accept, dismiss, get alert text etc.


  Alert alert = driver.switchTo().alert();
  alert.accept();
  alert.dismiss();
  String vAlertText = alert.getText();


How to handle Windows based pop up


Selenium can not handle window bases pop up. Selenium only handle things which are based on web. There are many ways to handle window based pop up.
We can use AutoIT third party tool or Robot Framework for handle window based pop up.

Please visit below post for how to handle windows based pop up (dialog box) using AutoIT.

How to Automate Non Browser Based Functionality with Selenium + AutoIT


How to Automate Non Browser Based Functionality with Selenium + AutoIT

Selenium can automate only browser based functionality if there is scenario that any non browser based functionality like windows dialog box comes than selenium can not handle. We need to use other tool for handle such scenario.

AutoIT is best open source tool for automate non browser based functionality with selenium. We have to first configure AutoIT with selenium before use.

For configuration part please go to below link and Configure AutoIT.

Configure AutoIT with Selenium

Don't forget to register 'AutoItX3_x64.dll' because it is very important. You can not use that .dll without register.

Once you are done with configuration then create one project for automate calculator.


 public static void main(String[] args) throws InterruptedException
 {  
  String jacobDllVersion;
  if (jvmBitVersion().contains("32"))
  {
   jacobDllVersion = "jacob-1.18-M2-x86.dll";
  }
  else
  {
   jacobDllVersion = "jacob-1.18-M2-x64.dll";
  }
 
  File file = new File("lib",jacobDllVersionToUse);
  System.setProperty(LibraryLoader.JACOB_DLL_PATH, file.getAbsolutePath());
 
  AutoItX autoIT = new AutoItX();
  autoIT.run("calc.exe");
  autoIT.winActivate("Calculator");
  autoIT.winWaitActive("Calculator");
  // Do 5 * 5 = 25
  //Enter 5
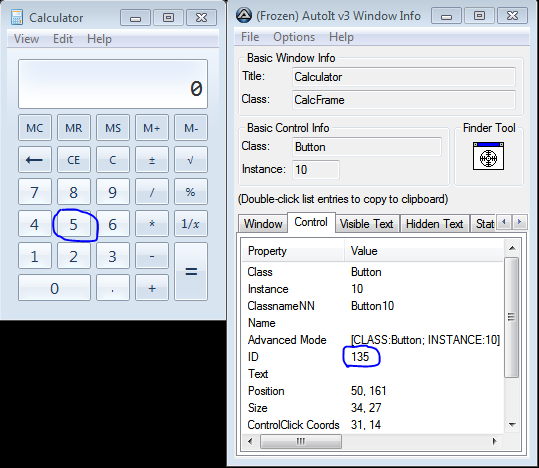
  autoIT.controlClick("Calculator", "", "135") ;
  Thread.sleep(1000);
  //Enter *
  autoIT.controlClick("Calculator", "", "92") ;
  Thread.sleep(1000);
  //Enter 5
  autoIT.controlClick("Calculator", "", "135") ;
  Thread.sleep(1000);
  //Enter =
  autoIT.controlClick("Calculator", "", "121") ;
  Thread.sleep(1000);
  // Get total and verify it should be 25
  String vTotal = autoIT.controlGetText("Calculator", "", "#32770");
  
  if(vTotal.equals("25"))
  {
   System.out.println("Test case Pass.");
  }
  else
  {
   System.out.println("Test case Fail.");
  }
  
 }

To get the Calculator button ids for the number 5 and = I used the Au3info application that is in the install directory of autoit-v3 that you downloaded and extracted.


Please add comment if you have any question.


Popular